
How to implement a labeling tool for image classification in a Jupyter notebook
'Hotdog' or 'not hotdog'? That could be the question — at least when performing an image classification task. To be able to address this or a similarly important question by means of a machine learning model, we first need to come up with a labeled dataset for training. That is, we sometimes have to manually look at hundreds or even thousands of images that do or do not contain hotdogs, and decide if they do.
One way to do that would be to open up one image at a time and keep track of image classes in another file, e.g., a spreadsheet. However, such a heavy-handed approach sounds rather tedious and is likely prone to fat-fingering errors. Wouldn't it be great if there was a streamlined solution that makes this labeling process more efficient, even fun?
That is exactly right and also what we set out to do in this article: Create a simple annotation tool to easily assign class labels to a set of images.
Image classification and the need for yet another labeling tool
Image classification is one of the most fundamental applications of machine learning to computer vision. Of course, applications will not always be as mundane as telling hotdogs from other foods, but this simple case makes a good graphic example for illustrating what we are after. Real contexts in which we have encountered image classification problems are, for instance, the extraction of information from technical drawings, the automatic attribution of detected defects, or the visual inspection of the success of a manufacturing process in one of our ongoing projects. As with all supervised learning techniques, it is necessary to feed the training loop with labeled data for the algorithm to be able to pick up patterns in the images.
Now, if your use case does not entail a conveniently labeled dataset such as the ubiquitous imagenet, manual labeling work is necessary before we can even start to train a machine learning model. As discussed in earlier articles on labeling tools for computer vision and NLP, there are many commercial or open-source solutions available for the labeling process, all with their advantages and disadvantages.
So why do we need an additional tool if there are plenty of solutions out there already? Here, it is important to keep in mind that labeling is oftentimes carried out by an expert in the problem domain who is not very familiar with the intricacies of machine learning. Hence, the labeling tool should be as intuitive as possible while abstracting away from functionalities needed only for more nuanced computer vision tasks such as image segmentation or object detection. However, for simple image classification, a full-fledged labeling solution can add substantial complexity to the workflow without bringing substantial benefits. Therefore, to fill this tooling gap, we have created a simple labeling tool ourselves in the context of one of our projects, which provides all the functionality required for image class labeling — and just that.
Making a Jupyter notebook interactive with ipywidgets
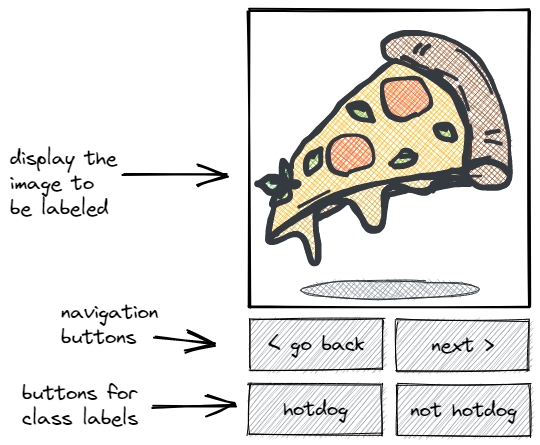
Let us suppose you need to label a dataset that contains images of various foods, and you are supposed to put them into the categories 'hotdog' and 'not hotdog'. Then all you want your labeling tool to do is show you one image at a time, provide buttons to assign the class labels to the image at display. Additionally, it would be convenient if there was a way to navigate between images.
For example, a simple tool could look more or less like this:
Jupyter notebooks have become an essential piece in the toolbox of many data scientists and researchers. As an interactive interpreter with graphical capabilities, Jupyter allows users to run short code snippets and perform basic data analysis. However, to implement an intuitive labeling tool we require interactivity beyond the ability to execute code. For example, we want the displayed contents to be dynamically updated whenever the user clicks on a button — in other words: we require JavaScript.
ipywidgets offers a handy solution to turn Jupyter notebooks into interactive applications. Among other things, it offers the possibility to add common widgets such as sliders, dropdowns, or buttons to apps and dashboards. That is, it lets you write code in pure python and generates all the necessary JavaScript underneath to create interactive HTML widgets that can run in your browser.
Getting started
So let us have a look at the modules and widgets we are going to use to create our simple labeling tool.
First, we import python's built-in
pathlibto properly work with the image file paths.Second, we would like to display one image at a time together with interactive buttons to the person doing the labeling. ipywidget's
Outputwidget offers a neat way to leverage IPython’s display capabilities, while theButtonwidget lets you add interactive buttons to the tool. AdditionallyLayoutserves to define the dimensions of the inserted widgets, andHBoxallows to align a set of buttons horizontally.Finally, we use
Image,display, andclear_outputfrom IPython's display module to serve and clear the displayed images.
Let us import all that by running the code snippet below:
from pathlib import Path
from ipywidgets import Output, Button, Layout, HBox
from IPython.display import Image, display, clear_output
Additionally, we need to set up some variables that define the labeling process.
We start by defining
classes— a list that holds the possible class labels that the labeling tool should display as buttons to the user. In our case, it holds the options"hotdog"and"not hotdog".Next,
pathis a Path object that points the tool to the directory in the file system that holds the images to be labeled, which we then automatically search for files with the extension '.jpg'. The respective filenames are then stored in the listimages.To start off with the labeling process, we also initialize an empty dictionary
labelsintended to hold the selected labels and an integer pointer to the current position calledposition.
# store list of available class labels
classes = ["hotdog", "not hotdog"]

# store path and search for .jpg images in path
path = Path("./data")
images = [img.name for img in path.glob("*.jpg")]

# set up empty dict for labels and initial position
labels = {}
position = 0
Displaying one image at a time
With all key inputs defined, let us now start to build up the various elements of the labeling tool.
Foremost, we want to display a single image for the labeler to look at and decide which class it belongs to. Once the labeler selects an image class or navigates to another image, the image display should switch to the next image.
To do that, we load the first image from the provided location by creating an instance of
Imagebased on the image path.For continuous updating of the image at display, we also create an
Outputcalledframethat we will always use to show the various images. Let us also choose a reasonable scaling for the image such that it blends in with the buttons later on and does not change when loading a larger or smaller image. We do that by specifying thelayoutargument ofOutput, e.g., we fix the vertical size atheight='300px'and the maximum horizontal dimension atmax_width='300px'.Finally, we have
framedisplay the first image.
image = Image(path / images[position])
frame = Output(layout=Layout(height="300px", max_width="300px"))
with frame:
    display(image)
Note that displaying the image in an Output is not the same as displaying it in the notebook directly. If we wanted to make the frame showing the image visible in our notebook, all it would take is to run display(frame).
But let us hold on to that, and instead create the other elements of our tool first.
Adding navigation buttons
The ensuing element in our sketch is to add a set of navigation buttons to jump between images.
Here, the first step is to define what should happen once each button is clicked. So let us write a function next_image that runs whenever the user clicks on the 'next >' field. All this function has to do is to update the position of the labeling process and refresh the image display with the corresponding image.
That is, it first increments the
positionvariable by one.As a bonus, we make it jump back to the beginning when the position reaches the end of the images.
With the position updated, we simply load the corresponding image and refresh the display in
frameby first clearing the current display, then showing the new one:
def next_image(*args) -> None:
    """Select the next image and update the displays."""
    global position, image

    # update position
    position += 1
    if position == len(images):
        position = 0

    # refresh display
    image = Image(path / images[position])
    with frame:
        clear_output(wait=True)
        display(image)
Note two little tricks we used to make this work:
First, we allow the function to accept additional inputs, such as a button, by specifying
*argsin the function signature.Second, the function can modify the variables
positionandimageoutside the function scope by using theglobalkeyword.
Now, to create an interactive element for our tool, we just need to create a Button instance and link the next_image function to it like so:
forward_button = Button(description="next >")
forward_button.onclick(next_image)
Equivalently, we now know how to create a function to go to the previous image and link it to a corresponding button. We will henceforth assume such a backward_button exists and has been stored together with the forward_button in a list navigation_buttons like so:
navigation_buttons = [backward_button, forward_button]Adding buttons to assign class labels
Displaying images and being able to switch between them is already respectable and all, but the key functionality is still missing. In particular, we want to be able to assign class labels to the current image and store this data in a dictionary. To achieve that goal, we again write a function that we will later attach to a button.
This time, the function should take in a Button object and extract the label name from it. It should then store an 'image name', 'label' pair in the global dictionary labels.
Let us have a look at the function store_label below:
def store_label(button: Button) -> None:
    """Annotates the current image with the button's description."""
    global labels

    # store the assigned label
    current_image = images[position]
    labels[current_image] = button.description

    # move to next image
    next_image()
This function gains access to the class name through the input button's description attribute. It will also be able to modify the labels dictionary by again using the global keyword. All it does from there on is add an entry to labels that contains the name of the current image as a key, and the extracted class label as a value. Finally, it switches to the next image by calling the previously defined next_image function.
Now, let us create one button for each candidate image class and collect these buttons in a list with the name class_buttons. We achieve this by simply looping over the initially defined list classes, each time creating a new button with the respective class in its description and the store_label function attached:
class_buttons = []
for label in classes:
    label_button = Button(description=label)
    label_button.onclick(store_label)
    class_buttons.append(label_button)
In our simple example, it will create buttons for the binary classes hotdog and not hotdog and collect them in class_buttons.
Putting the pieces together
Now, having created all the elements we can start displaying them the following way:
display(frame)
display(HBox(navigation_buttons))
display(HBox(class_buttons))
Note the HBox around the lists of buttons to align them horizontally and display them next to each other.
As soon as we run the above code snippet, our Jupyter notebook will start displaying the frame, the navigation_buttons and the class_buttons, and we can start interacting with it:
That looks pretty much like what we intended!
Now let us see if the labels are stored in the labels dictionary:
>>> print(labels)

{'19.jpg': 'not hotdog', '14.jpg': 'not hotdog', '50.jpg': 'hotdog', '23.jpg': 'not hotdog'}
Fantastic, it also saved the labels! That was easy, wasn't it?
To roll out such a tool we should probably modularize it in an object-oriented way, such that it integrates all the described elements into a concise class LabelingTool. We will then store the elements of the labeling tool as object attributes, which avoids the clumsy workarounds with global variables above. This step does not only have the advantage that the required code is more compact, but it also makes the tool portable as it can easily be imported into a short notebook that runs the tool.
The first couple of lines of code to initialize the tool could then look like this:
class LabelingTool:
	"""A tool for image classification labeling to run in a jupyter notebook."""

	def init(self, classes: list, path: str) -> None:
		"""Construct all necessary attributes for the LabelingTool object."""

		# store list of available class labels
		self.classes = classes

		# store path and list of .jpg images in path
        self.path = Path(path)
        self.images = [f.name for f in self.path.glob("*.jpg")]

        # set up empty dict for labels and initial position
      	self.labels = {}
      	self.position = 0
We have already seen the same setup of variables above, except that they are now part of the init method. Naturally, all functions will then also be implemented as methods that modify the attributes.
If you want to look at the full implementation, you can do so in our public GitHub repository. Of course, also feel free to clone and modify it to cater to your own needs.
Conclusions & extensions
In this article, we have demonstrated how to get the basic framework of an interactive labeling tool for image classification to run in a Jupyter notebook. The tool is able to display changing images, and a set of buttons allows to interactively annotate image data with class labels, which the tool saves internally.
Going further, I am sure you have many exciting ideas on how to improve this simple framework. For example, some useful extensions for the tool's functionality could...
...display a progress bar for the labeling process
...provide a shortcut to jump to the first unlabeled image
...store labels on disk as a
.jsonfile, possibly even automatically after every click...allow the possibility to load existing labels from disk
...catch some exceptions (e.g., when all images are labeled or there are no images in the image directory)
...display some info about the current image, such as filename and whether there already exists a label
Despite all this unrealized potential, the simple framework laid out in this article provides a good starting point for flexibly tailoring a tool to your specific needs.
And remember, labeling is tiring work — making it as unambiguous and streamlined as possible makes life a lot easier for the labelers. As a result, you will get more consistent labels in a shorter time and can finally train your amazing image classifier on the newly labeled data.
Contact
If you would like to speak with us about this topic, please reach out and we will schedule an introductory meeting right away.